Showing posts with label eng. Show all posts
Showing posts with label eng. Show all posts
Sunday, July 6, 2025
Fairy Tale Ark vs Scaled Down Model ... what about a House that's a Scaled Down Model?
And thus shalt thou make it: The length of the ark shall be three hundred cubits: the breadth of it fifty cubits, and the height of it thirty cubits
[Genesis 6:15]
So, a roof might be less than 3 m high, what about ... 2.10 ?
That would make the length 21 m. and the width 3 1/2 m.
In fact, longhouses are in Old Norse Scandinavia somewhat similar proportions, but typically broader in relation to the length. One of 29.42 m would have been 8 m broad. It had a middle room of 18 * 8 m, and shorter rooms at both ends of the house. There were sixteen of that exact model, grouped in four squares around the central courtyard of the Viking fortress, the Trelleborg near Slagelse.
Older longhouses in those countries are at Gudme, and archaeological finds are typically 200 to 550 AD, from very much closer to when I think Oden came up to Norse countries. Gudme is also 46.1 km from Odense, which literally means "temple" or "hallow of Oden" ... I wonder if Oden invented the longhouse (he certainly didn't create the world!) with the proportions of the Ark in mind? My suspicion is still, he was a Hebrew apostate. Parts of the Norse myths indicate he was familiar with the Ancient Near East, including but not limited to the Bible. Havamal could easily be partly inspired by the Ecclesiastes. So, why not the first longhouse inspired by the proportions of the Ark?
Not too easy to make a children's toy of, though. If you took half the proportions I suggested, you'd have sth small children could play in, but it would be adequate for a kindergarden rather than just a large family.
10.5 m = 393,7008 inches, so, 19.299 cubits.
19.299 / 300 = 6.433 % of each direction, one in 15~16.
Perhaps a new staple in private Evangelical daycare of the kindergarden type?
Hans Georg Lundahl
Paris
IV Lord's Day after Pentecost
memory of St. Maria Goretti
6.VII.2025

Monday, September 23, 2024
Saturday, November 11, 2023
If You Get Sea Water
Desalinate it.
Or dilute it.
Desalination is done by evaporating sea water and collecting the vapours as they condense on some surface, for instance a transparent plastic sheet, if you do it under sun light, or a pan if you boil the sea water in a kettle.
Totally salt free water is not too goof either, distilled water can be improved in taste by adding a very small quantity of sea water to it./HGL
Tuesday, January 25, 2022
How to Tunnel Through a Mountain with Pre-Modern Equipment
Hannah Fry (a longstanding team member on Numberphile) had a lovely exposé about how the ends of the tunnel meet up:
Tunnelling through a Mountain - Numberphile
23rd Jan. 2022 | Numberphile
https://www.youtube.com/watch?v=kwrDX5qkwvA
She left however somewhat vague (though she offered suggestions) how they knew where E and S were, and that the elevations were equal on both sides, here I step in:
1) E, W and S, N:
5:54 Compasses - drawing tool, yes.
Magnetic tool for finding N, S, anything at right angles (E, W) and anything in between, no.
Marco Polo brought these latter ones from China. In his day magnetite was explained as:
- element earth
- under influence of Mars to make it iron
- and then under influence of Venus to make it attract.
Magnets worked even so, and as said, it was in China they were first used for compasses. In early modern times they were equipped with a paper that marked off not just quarters, not just eighth parts (NE, SW etc), not just sixteenths (NNE, ENE etc) but even thirtyseconds (E by N, ENE by N)* ... Belloc wrote an essay about a sailor who went mad as his captain or boatswain was explaining this.
Now - what did Polycrates (po-LEE-kru-TEES) use, as he lived before Marco Polo?
You might use the other type of compass or simply strings and pegs, in drawing straight angles, and that would include straight angles between a shadow marked at sunset and one marked at sunrise. At equinox these would be due W and E of what was throwing the shadow, and either way they would make a line due W-E, so that a straight angle would mark the exact time when the sun was in zenit, the shadow straight N.
Ensuing exchange:
- Mark Tillotson
- But the magnetic properties of iron were known the Greeks, its not a big stretch for them to have the compass - after all we get the word magnet from the greek region of Magnesia, so they had magnetic rocks and iron. Thales of Miletus described magnetic phenomenon (we only have second hand accounts of this apparently) - a lot of knowledge may have been lost to the ravages of time.
- Hans-Georg Lundahl
- @Mark Tillotson We have no direct reason to believe Greeks used magnets for compasses.
We have no reason to believe seafarers would have lost such knowledge if they had had it.
We have every reason to believe that Marco Polo got the magnetic compass from China. And that prior to him, it was unknown in the Mediterranean.
Greeks were not all that famous for practicality in using scientific discoveries. Nero used a lens as a magnifying glass, but corrective eye-glasses only came with the Middle Ages. Archimedes used a screw for elevating water slowly - around 1400, Europe had a practical push and lift pump and was attaching objects to each other with screws turned by screwdrivers. While screws for oil presses / wine presses already existed in antiquity, Europe added screws for woodcut pressing and printing with moveable types in the Middle Ages.
2) Elevation:
6:57 Build a momentary dam around the whole mountain or at least on one side the entrances need to have contiguity around the mountain.
Then fill that dam with water. Tada, entrance levels are equally high!
* Correction on these
"(in first quadrant) north by east (NbE), northeast by north (NEbN), northeast by east (NEbE), and east by north (EbN)"
Thank you, wiki:
https://en.wikipedia.org/wiki/Points_of_the_compass
Tuesday, September 28, 2021
Washing in Laundries? A Tip ...
Put a tennis ball or two into the machine.
If you wash without machines, you push the dirty clothes around with your hands, or if the water is too hot, with a wooden spoon. In a machine, you cannot get either hands or spoon into it, but a tennis ball will do the same work.
I got this tip from a man in the lavomatic who had it from his grandmother.
Best wishes with your washing!/HGL
Friday, January 25, 2019
Getting a logo or URL for a poster the right distance of letters.
Imagine you were writing the German word PFEFFERMINZ. On a cardboard, with a pen or pencil, by hand.
You start out, at approriate distance P and Z and take an E right between them - but why?
Because the second E in PFEFFERMINZ is right between P and Z (this is also the reason why Eduard Haas III gave PEZ candy its name, as abbreviation of PFEFFERMINTZ).
Shall we check?
P P
F (1)
E (2)
F (3)
F (4)
E E
R (1)
M (2)
I (3)
N (4)
Z Z
Right. Four letters between P and E, four between E and Z.
Next two letters (see you later, PEZ, perhaps), or in this case four letters ... why four, why not two? With an uneven number of intervening letters, it would logically be two, the mid letter between P and E, the mid letter between E and Z. But with an even number of intervening letters, there are two mid letters in each stretch.
| P P
F (1) E E F F F (1) E E R (1) M (2) I (3) N (4) Z Z | P P
F (1) E E F F F (1) E E R (1) M M I I N (1) Z Z |
As you can see, some are already next to each other, so, now we have four stretches with one intervening letter each. Once they are all filled in, the word is fully written out:
| P P
F F E E F F F (1) E E R (1) M M I I N (1) Z Z | P P
F F E E F F F F E E R (1) M M I I N (1) Z Z | P P
F F E E F F F F E E R R M M I I N (1) Z Z | P P
F F E E F F F F E E R R M M I I N N Z Z |
Now, PFEFFERMINTZ has exactly 11 letters. This means there is a mid letter and this means the two new stretches of unwritten letters will be four letter spaces long, with two mid letters instead.
Anything in a series of 5, 9, 13, 17, 21, 25 (1+4n) will have uneven new stretches too, so you go for two mid letters on of each stretch in the second stage as for the one mid letter in the whole stretch first step. If you think of it, this means, you can also divide words with two thirds letters, if there are stretches (original and perhaps subsequent) that arrive in words with 4, 7, 10, 13, 16, 19, 22, 25 (1+3n) letters.
ROBBERS has a total of seven (so is HTTP:// btw) ...
| R R
O (1) B (2) B (3) E (4) R (5) S S | R R
O (1) B B B (1) E (2) R (3) S S | R R
O (1) B B B (1) E E R (1) S S | ||
| R R
O O B B B (1) E E R (1) S S | R R
O O B B B B E E R (1) S S | R R
O O B B B B E E R R S S |
I could just as well have gone from two ends to middle B. The main thing is, you start at end points, you continue to mid point or mid points, you go on from there. I am not going to detail each case for you.
Here is an example with more than one line, and I did longest, middle line first:
| H | T | T | P | : | / | / | | | (7, + 5 before, + 5 after) | |||||||||||
| L | - | O | - | A | N | T | I | M | O | D | E | R | N | I | S | M | | | (17) | |
| . | B | L | O | G | S | P | O | T | . | C | O | M | | | (13, + 2 before, + 2 after) |
If it looks uneven, it is because I (in ANTIMODERNISM) and M (in COM) are superposed on equal space, and computer printed letters don't quite do that. If you do it by hand, as this is meant for, you can make the I slightly slanted to be a bit broader, the M slightly narrower or the vertical lineup slightly less even, so the horizontal distances get more even. By the way, here is the link to Latest on Antimodernism which is what the URL is URL to. It's a blog where I put widgets with latest five posts on each of the blogs that are featured in widgets on it.
Hans Georg Lundahl
Nanterre UL
Conversion of St. Paul
25.I.2019
Updated with bold letters for the ones being added to a layout./HGL
Friday, August 31, 2018
I am trying but failing to get a good diagram for this ...
You know, the kind of thread work in which the threads make a nice and curvy pattern, while being drawn straight.
I'd like to reuse such a pattern as basis for a little net. Two things would be necessary :
- making a diagram on cardboard;
- that this diagram in no point crosses more than 2 lines (or threads).
Because, then I could use the crossing points of lines as interlocking points for strands in the net.
Here are my failures:


As you can see, there are too many "threads" or lines crossing at some points. If you want to interlock two strands in a net, you need to have a point at which two lines are crossing, and you need it sufficiently distant from next point where two lines are crossing./HGL
PS : here too:


Sunday, July 9, 2017
Folding quiers - plier les cahiers d'imprimérie (ou de photocopies)
| 1 | 2 | 3 | 4 | 5 | 6 | 7 | 8 |
| 9 | 10 | 11 | 12 | 13 | 14 | 15 | 16 |
| 17 | 18 | 19 | 20 | 21 | 22 | 23 | 24 |
| 25 | 26 | 27 | 28 | 29 | 30 | 31 | 32 |
| 33 | 34 | 35 | 36 | 37 | 38 | 39 | 40 |
| D'abord la première ligne. | First the first line. | |
| 1 and 8 are extremes, and 4 and 5 are mid pages. | 1 et 8 sont les pages extrêmes et 4 et 5 les pages moyennes. | |
| Les autres pages en italiques sont les pages du côté verso de l'impression. | The other pages, in italics, are the pages of the verso side on the print out. | |
| These should be folded to each other so 2 touches 3 and 6 touches 7. | Celles-ci doivent être pliées entre elles pour que 2 touche 3 et pour que 6 touche 7. | |
| Après le premier pli, donc, on a les pages extrêmes d'un côté et les pages moyennes de l'autre. | After the first fold, then, you have extreme pages on one side and mid pages on the other one. | |
| The second fold makes the two mid pages touch and makes the extremes the two outer pages of the whole folded quier. | Le deuxième pli fait que les pages moyennes se touchent et fait des deux pages extrêmes les pages ... extrêmes ... du cahier en entier. | |
| Et les lignes suivantes répètes le processus pour les cahiers à suivre, jusqu'à page 40. Les pages 41 - 48, 81 - 88 et 121 à 128 reprennent le schéma avec chaque fois 40 de plus. | And the following lines repeat the process for following quiers, up to page 40. The pages 41 to 48, 81 to 88 and 121 to 128 reuse the pattern with each time forty more. |
Hans Georg Lundahl
Bagnolet
5th Sunday after Pentecost
5ème Dimanche après Pentécôte
9.VII.2017
Thursday, April 27, 2017
Are Moveable Walls Good Church Architecture?
I don't think so. Not generally speaking. While an iconostasis is technically movable, it is usually not moved, as long as the Church remains in function.
I was however not always Catholic with some penchant for Eastern Rite, I was at one time learning to pray and read the Bible in Churches - if one may call them so - which have moveable walls.
It didn't hurt, because these walls, when there did not carry any icons, and when moved, did not remove icons with them. These Churches are my own most vivid experience of what usually is conference centres.
Someone who presumably agrees with me on Church Architecture, is producing these assets for conference buildings, and if you live in or near Athens, I suppose he may be the closest by to be doing so.
Here is a blog post which would indicate to professionals (I presume, not being one myself) that he knows what he is talking about:
Κινητοί Τοίχοι - Movable Walls : Η Ηχομόνωση των Κινητών Τοίχων και σχετικές έννοιες*
Friday, September 23, 2016
http://movablewalls.blogspot.com/2016/09/blog-post.html
I do him this little favour because, perhaps, some people may expect me to do some favour to some business man, but also, more, this thing about movable walls brought back good memories. It was not under torture or threats of beatings I became a Christian, but playing and reading along in well aired buildings with movable walls, some of which also served to provide ma and me with a separate sleeping room./HGL
PS, higher up on the blog, you will see some decorative examples of this concept. Restaurants can use it for advantage when accomodating companies of guests of diverse sizes, one evening a smaller one, with other guests on other side of a wall, one evening a bigger one, with walls removed./HGL
* All the text except the title is also available in English on the post.
Monday, September 5, 2016
From Blog Posts or Notebook to Book : Part II, from reproducible originals to books you can turn the pages of
From Blog Posts or Notebook to Book : Part I, up to reproducible originals · Part II, from reproducible originals to books you can turn the pages of
A Copying.
For each fold or 8 pages ...
... Title page to 8, 9 to 16, 17 to 24 and so on ...
or
... Title page to uiij, 1 to 8, 9 to 16, 17 to 24 and so on ...
use the originals produced in part I for recto verso copying, most usually in A4 (doing recto verso to A3 might be irksome or impossible).
Do it in as many copies as you like.
For the cover, make as many copies of the one sided original where the title page is (or of other page including title page and back cover blurb?).
For instance, I had a booklet with long preface up to p. uiij and pages of regular text up to p. 56. That is eight recto verso for the folds, 16 copies worth, since each recto verso counts as two copies, and an extra copy (one sided) for the cover = each example is worth 17 copies.
B Folding and first gluing of cover.
All folds or quiers or two sided printing sheets are folded like this:
first fold is vertical along a horizontal line, second fold is horizontal along a vertical line;
the two pages that are side by side (iu & u, 4 & 5, 12 & 13 and so on) are outside of first fold and inside of second;
the two pages that are extreme (uiij or 8 and title page, 16 & 9 and so on) are other outside of first fold, outsides of second fold.
Cover page copy can be divided along a vertical line, this is the method I am using right now and will first describe.
One piece of it will have the title page and a page head to head with it.
Other piece will have either other two pages of recto for first quier or a blurb and a page head to head with it...
...now fold both pieces so that title page, possibly blurb, fold down "on front". Unfold, so title page and possibly blurb come on top. Glue other pages of front and back covers onto the first and last quiers, adding "two pages extra tall" before first and after last.
Let the glue dry.
Note that each printed sheet as folded is hereafter known as one quier. It is the same word as French "cahier".
C For sewing, you need holes.
More specifically, you need the holes in all quiers and lower part of cover sheets to match up.
Fold a piece of thick paper or cardboard straight. Its double rim on one side at least should be straight enough to match up with sides of a folded quier. Length of fold should be a bit less than half length of second fold of each quier.
Draw a line on it, 3 mm or "one line" from the fold. Use needle to push four holes in it. Fairly equidistanced. Outer two should be about 1 cm or "four lines" from the limit of the paper or cardboard.
Now put each quier with its longer fold into the folded cardboard, matching up first shorter folds, then opposite side of quier with four leafs with the straight rim of the cardboard, and on each side punch four holes with needle.
When you punch the eight holes in first and last quiers, title page and "blurb page" (whether actually holding a blurb or not) should be folded up, away from the page which is glued to outer page of quier. If you start punching holes just after above gluing of cover, punch these two quiers last, so glue can dry at least some. The "show pages" (title and blurb) must be kept folded up and away, off the sewing all through next moment.
D Now, sewing the quiers.
When all quiers have their holes punched, thread a needle same size or thinner than the one you used for punching. Use a fairly long thread, you will still probably have to thread it again.
Divide the quiers (in the right order, cover's title page and blurb page folded up and away) into two and start sewing from the middle of the book.
Start at either lowest set of holes and sew upward, or highest and sew down or from two midmost and sew out both directions, but decide which you do before starting to sew.
Glue some on the paper near to your "first hole", glue the double thread end onto it, let it rest. Then, when glue is solid, sew through first hole ofall quiers from mid front to front, just pulling thread through the row of holes.
Now make sure all the double thread is pulled through.
Turn the quiers together so you see first hole from front, where thread comes out. Turn needle behind first quier from front, push it through the first quier's first hole again. If you did right, you now have the double thread first going through front row of first holes, then looping into front most first hole and out on front again. Draw out the thread so loop is tightened.
Next loop is over fold of frontmost quier and fold of the one inside it. I will label it quier II. Needle should now go into first hole of quier II and up between quiers II and I. See below how.
Next loop is over folds of quiers II and III, needle through first hole in quier III, up between quiers III and II, and so on, all the way to back of book. In the first row of holes, this means that after middle you will be adding quier after quier by making loop after loop. Continue: until you have pulled up needle between last quier and second last quier.
Last loop after that, over fold of only last quier, needle through first hole in it and through all first holes in a row back into the middle where you started.
Most of the time, you will be doing this with quiers already attached to each other. If you sew from front, as here described, pull out the quier around which you make loop both from what is behind it and what is in front of it, gently, not too far, you don't have all that much room. Put needle point behind it, push needle point down front (with needle eye slightly up behind it) through the hole. Then paddle the needle eye down, slightly, so as to get needle point up, after the hole (before the hole, as you watch it) and now push needle up from below. Avoid making scratches.
In the very first row, after middle, you can actually sew from behind and have each new quier hindmost, and that is easier - but from second row on, you don't have that luxury.
Now get needle under thread where it starts out from glue attachment, then up to second hole. Now repeat all of above but applied to second hole. Except, this time you don't need to add quiers, they are already there.
Whenever, from second hole on, the loops pass the middle, make sure the loop around quier just after middle when (double) thread goes up in middle, also loops where the thread started out from middle. And whenever you come back to middle again, pass thread through those two, before going on to next set of holes.
If (as it will, at least unless you start with the two rows of holes closest to middle), thread starts becoming short, thread another needle, make a flat knot around "thread ends" of one double thread and "needle end" of the first one. If you only have one needle, you may be better off gluing the ends to the paper and let it dry before going on to sew. Either way, you cut needle free from first double thread before going on.
When all sets of holes above or below first hole to the end of the book are sewn, attach some glue, cut strings off from needle and curl them into the glue. Let dry.
E This Back is not Blurb Page, but the back you see in a bookshelf
If you have spoiled copies, you have some scrap paper. Cut or fold-and-rip the A4 into four A6. If you have relatively few quiers (for 8, it is certain, for ten perhaps at least probable), now cut or fold and rip the A6 along its longer axis. Then fold that paper again, still along the longer axis. Glue the inside of the fold, fold it together and press around glue. Let dry.
Now punch holes, exactly as you did with the quiers.
Now glue one side of the back with its holes, fold that side closer to the quiers and folds, and attach sewing through the holes you made for the binding as such as well as the holes for this back. Let the thread go back and forth between front and back (as in blur side, this time) making a prolonged figure 8 with appropriately many loops through all the holes.
First hole, attaching the back is tricky. From second hole on, it gets easier, but you will have to pull the thread some times over, since the back will be trying to bend outward into flat, away from the quiers. Don't give up. When you are done, you should have by the newer sewing have attached to the first and last quier the glued back. Now let dry.
F Finishing front and back covers (and this back is the blurb page, if you have a blurb)
Glue over the leaf that is now glued in between first quier and bookshelf back in front, fold the title page over it, push all over so the glue comes even underneath.
Do the same with the blurb side.
Now lay it all under a press, and let it dry.
G Tips if you want a real blurb and a printed bookshelf back:
Do this before making the books - or after you tested on first example that the width of the quiers is right for the size of back I propose.
Make a special single page (recto only) print, not of the recto of title page quier, but of a sheet having title page and whatever you want as blurb page printed in the right quarters of it.
As to bookshelf back, the size I have here discussed is the quarter width of an A6 with all its length, printed, other quarter width (to make it thick), not printed. This printed/not printed half width is repeated other half width of the A6 and twice again on the A6 beside and that is repeated on the two A6 parts above.
First take or blank print an A3. Fold its width in four. Then write appropriate text (like author and title) as close to middle of every second of the four strips. Make text fairly large, it will be diminished. Now lay this on the A3 field of the copying machine, make two smaller prints in A4.
Lay these two side by side on the A3 field, copy to two smaller A4.
These on the A3 field, diminished to a single A4 will give you eight useable backs on the 8 "half width A6 pages" it comprises. Bigger sizes of same text can be used for decoration outside books, or as scrap paper.
Hans Georg Lundahl
Nanterre UL
St Lawrence Giustiniani of Venice
5.IX.2016
PS, I had nearly forgotten, but when the last gluing is dried, there is one step more : you need to cut the top folds, the first folds. Not the back folds, second folds, which are protected by the sewing and the bookshelf back, but the top folds. It's no great fun (after novelty has passed) for most people reading only pages 1, 4, 5, 8, 9, 12, 13, 16 and missing 2, 3, 6, 7, 10, 11, 14, 15./HGL
Monday, August 29, 2016
From Blog Posts or Notebook to Book : Part I, up to reproducible originals
From Blog Posts or Notebook to Book : Part I, up to reproducible originals · Part II, from reproducible originals to books you can turn the pages of
- A) For a notebook :
each pair of facing pages is numbered as two pages going later side by side on reproducible original
8 - 1 : 16 - 09 : 24 - 17 : 32 - 25 : 40 - 33
2 - 7 : 10 - 15 : 18 - 23 : 26 - 31 : 34 - 39
6 - 3 : 14 - 11 : 22 - 19 : 30 - 27 : 38 - 35
4 - 5 : 12 - 13 : 20 - 21 : 28 - 29 : 36 - 37
48 - 41 : etc : 88 - 81
42 - 47 : etc : 82 - 87
46 - 43 : etc : 86 - 83
44 - 45 : etc : 84 - 85 : etc
and pages are written in the order they are numbered in. First two facing pages, you write on p. 1, to the right, then turn the page, write p. 2 on the left, then turn the page, write p. 3 on the right, then turn the page, write pages 4 and 5 in order, turn the page back, write page 6 to the left, turn the page back, write page 7 on the right, turn the page back, write page 8 to the left, turn a few pages and start next four pairs of facing pages by writing p. 9 to the right. And so on.
Copy these as pairs.
If notebook has an opened size greater than a lying A4, diminish, and glue the pages to A4s folded on the middle in a symmetric way.
Use then these copies or glued copies like this: 8 - 1 head to head with 4 - 5, 2 - 7 head to head with 6 - 3. 16 - 09 head to head with 12 - 13, 10 - 15 head to head with 14 - 11, and so on.
Usually two A4 lying "beside each other" (physically) or "head to head" (as pages go in writing) on the A3 screen of a copy-machine. Diminish to A4. You now have reproducible originals.
- B) For blog posts:
Successive posts are copied and pasted onto a word document. It should then be blued all over (select all) and points of font size be put twice as large as you want the final book. If you want book in 12 points, the font size on word should be 24.
Not just font size, but also font, paragraphing and hyphenisation at end of lines can be refined at this stage.
Instead of making one word document for all of the book, you can make more than one word document.
Next stage is numbering the pages.
After that, the pages are divided into lots of 8. These are then subdivided like this:
8 - 1 : 16 - 09 : 24 - 17 : 32 - 25 : 40 - 33
2 - 7 : 10 - 15 : 18 - 23 : 26 - 31 : 34 - 39
6 - 3 : 14 - 11 : 22 - 19 : 30 - 27 : 38 - 35
4 - 5 : 12 - 13 : 20 - 21 : 28 - 29 : 36 - 37
48 - 41 : etc : 88 - 81
42 - 47 : etc : 82 - 87
46 - 43 : etc : 86 - 83
44 - 45 : etc : 84 - 85 : etc
Two and two these A4 pages are set side by side on A3 screen of copy-machine and reduced to a single A4.
Then these A4's with two pages are further reduced: 8 - 1 head to head with 4 - 5, 2 - 7 head to head with 6 - 3. 16 - 09 head to head with 12 - 13, 10 - 15 head to head with 14 - 11, and so on.
Usually two A4 lying "beside each other" (physically) or "head to head" (as pages go in writing) on the A3 screen of a copy-machine. Diminish to A4. You now have reproducible originals.
- C) If you missed a preface, a title page, a few pages about how you have the copyright (unique or shared), well, add an extra 8 pages:
uiij - [i=] Title page
[ij=empty] - uij
uj - iij
iu - u
This is inserted before the other ones. Treated exactly like above, should yield two single faced originals with uiij - [i=] Title page head on head with iu - u and [ij=empty] - uij head on head with uj - iij.
- D) Speaking of copy-right!
If you take the posts from a blog, it should be one of following:
- a) your own;
- b) someone else's who gave you a personal permission to print it as books;
- c) someone else's who gave a general licence (if excluding certain categories, make sure you are not on an excluded list) to do so;
and if the personal permission or general licence marks "non-commercial use only", you cannot sell the books.
My own general licence has no exceptions, and it is not marked "non-commercial use only", so you can sell books if taking it from my blog posts (insofar as these are entirely my own, for posts with shared copyright, there is another owner to consult as well*). In return I hope some of those who do so will be sending me money for it. - a) your own;
Hans Georg Lundahl
Nanterre UL
Decapitation of St John the Baptist
29.VIII.2019
* I'll here link both to my licence and to the exception clause for posts with shared copyright:
hglwrites : A little note on further use conditions
https://hglwrites.wordpress.com/a-little-note-on-further-use-conditions/
Antimodernism : Copyright issues on blogposts with shared copyright
https://antimodernismus.wordpress.com/2015/06/02/copyright-issues-on-blogposts-with-shared-copyright/
Thursday, March 3, 2016
Tuesday, December 1, 2015
Printing Books / Imprimer des Livres
English description:
Recipes from Home and Abroad : Instructions about Printing
http://recipesfromhomeandabroad.blogspot.com/2014/01/instructions-about-printing.html
Description française:
New blog on the kid : Il vous est arrivé de plier un papier?
http://nov9blogg9.blogspot.com/2013/12/il-vous-est-arrive-de-plier-un-papier.html
Recipes from Home and Abroad : Instructions about Printing
http://recipesfromhomeandabroad.blogspot.com/2014/01/instructions-about-printing.html
Description française:
New blog on the kid : Il vous est arrivé de plier un papier?
http://nov9blogg9.blogspot.com/2013/12/il-vous-est-arrive-de-plier-un-papier.html
Thursday, June 18, 2015
Survival Tip, if you can find a cave by the seashore
According to Lumley, this is what Neanderthals did in Grotte du Lazaret, in Mont-Boron very near to Nice.
Inside the cave, make a hut, 3.5 by 11 meters (11 ft 6 in by 36 ft 1 in), using one cave wall and surrounding the space on other three sides with skins. And with a roof of skins as well.
Inside the hut, make beds by dried seaweed covered with skins and make two fireplaces, one near each end of the hut.
Use the fireplaces as dustbins too.
Should be enough for a Duggar sized family, or for a few smaller ones./HGL
Inside the cave, make a hut, 3.5 by 11 meters (11 ft 6 in by 36 ft 1 in), using one cave wall and surrounding the space on other three sides with skins. And with a roof of skins as well.
Inside the hut, make beds by dried seaweed covered with skins and make two fireplaces, one near each end of the hut.
Use the fireplaces as dustbins too.
Should be enough for a Duggar sized family, or for a few smaller ones./HGL
Tuesday, January 6, 2015
If ever you throw away old shoes – save the shoestrings !
1) Recipes from Home and Abroad : If ever you throw away old shoes – save the shoestrings !, 2) New blog on the kid : Can an Old Sack be Renewed by Macramé?
I did when last I threw away worn out shoes and I am not regretting it.
I am repairing a sack in macramé. Now some surfaces around original sack (which has many holes by now) I find best to cover in simple fishnet manner. But what is the simplest fishnet ?
One model is of course the one in which flat knots of row a are tied around strings for the flat knots of row b like in tight macramé – but with spacing. There you need a ruler or some solid or at least not too wobbly flat very oblong object of uniform breadth, like 1 inch or 1 inch 6 lines. But there is another model where old shoestrings become very much more relevant.
Between two strands of already done macramé (like my « skeleton » for the macramé sack) and these around the original sack filled with the luggage it is carrying, you tie up the shoestrings back and forth, vertically or horizontally. After each crossing, you tie it slightly around the strand and then around it again a bit further before going back, the shoestring grid is to be parallel.
Now comes the rub : you take the string you want to use – rather long – and attach it by a larkhead to the strands « around the web », then you « wrap » it around that outer strand and around the shoestring parallel, all the way to opposite strand. Then you attach it there, even if only turning it loosely around it. Then you go back in a parallel row, next shoestring being one part you « wrap » it around and the strings around first shoestring (where they go around it) the other part you wrap it around. Continue through all shoestring parallels until reaching opposite strand from first you « wrapped » the string around. Or until its double length is finished, then attach a new string with a larkhead until finishing the « fishnet ».
Hans Georg Lundahl
Bibliothèque Audoux
Epiphany Day
6-I-2015
PS : 1) don't forget to take away shoestrings when finished, if you have done it correctly, the « fishnet » should stay interlocked - as I suppose you have seen the net on the seat in front of you on some airlines; 2) if shoestrings don't suffice for the whole length, you can start unravelling in the back where the « fishnet » is already interlocked and tie in front; 3) obviously you could use used chopsticks as well, a pair will suffice for reason given in « two », you can take the first away once the second is used and tie it in front of the first one, and so on, and you get new chopsticks of wood next time you eat at a sushi bar or a China food./HGL
I did when last I threw away worn out shoes and I am not regretting it.
I am repairing a sack in macramé. Now some surfaces around original sack (which has many holes by now) I find best to cover in simple fishnet manner. But what is the simplest fishnet ?
One model is of course the one in which flat knots of row a are tied around strings for the flat knots of row b like in tight macramé – but with spacing. There you need a ruler or some solid or at least not too wobbly flat very oblong object of uniform breadth, like 1 inch or 1 inch 6 lines. But there is another model where old shoestrings become very much more relevant.
Between two strands of already done macramé (like my « skeleton » for the macramé sack) and these around the original sack filled with the luggage it is carrying, you tie up the shoestrings back and forth, vertically or horizontally. After each crossing, you tie it slightly around the strand and then around it again a bit further before going back, the shoestring grid is to be parallel.
Now comes the rub : you take the string you want to use – rather long – and attach it by a larkhead to the strands « around the web », then you « wrap » it around that outer strand and around the shoestring parallel, all the way to opposite strand. Then you attach it there, even if only turning it loosely around it. Then you go back in a parallel row, next shoestring being one part you « wrap » it around and the strings around first shoestring (where they go around it) the other part you wrap it around. Continue through all shoestring parallels until reaching opposite strand from first you « wrapped » the string around. Or until its double length is finished, then attach a new string with a larkhead until finishing the « fishnet ».
Hans Georg Lundahl
Bibliothèque Audoux
Epiphany Day
6-I-2015
PS : 1) don't forget to take away shoestrings when finished, if you have done it correctly, the « fishnet » should stay interlocked - as I suppose you have seen the net on the seat in front of you on some airlines; 2) if shoestrings don't suffice for the whole length, you can start unravelling in the back where the « fishnet » is already interlocked and tie in front; 3) obviously you could use used chopsticks as well, a pair will suffice for reason given in « two », you can take the first away once the second is used and tie it in front of the first one, and so on, and you get new chopsticks of wood next time you eat at a sushi bar or a China food./HGL
Wednesday, October 22, 2014
Diagrams for Knots - Examplified by Two Loop Spanish Mat
The Spanish Mat or whatever it is called in English is a knot, which can be used for doormats in larger format or for hot pads in smaller format.
It differs notably from the Turkish knot which is more gridlike and only bends on the outside of the knot. For the Spanish Mat you start with on to five loops which remain such. And only loop or central loop crossing must contain at the end two strands crossing along one diagonal and one along the other one, and as the strand does that it also bends on the outside.
Let us say you start out with two loops, these point upward, the strand crosses itself in the same direction below. Then you make the central loop crossing so the strands at its lower end cross the other way. THEN you fill in the knot from the outside, so that in the end the central loop crossing has one diagonal one strand through, opposite diagonal two strands through. And this is where it gets complicated to describe in words without making a diagram. So, instead of getting on, why don't I tell you about the diagram making? You draw after my instructions, and then make the knot according to the drawing.
To start the drawing you assume the two loops have already crosses, so what you draw will be one left loop and one right loop with one almondshaped space in the middle. Draw them in one ductus of the pen.
Then concentrate on that central space. Draw two parallel lines low left to up right and one line crossing both within the loop (it can be bent so it's vertical in the middle, like a backward oblong s) upper left to lower right.
Then continue the lines to the outside of the two loops, under their upper crossing obviously and over their lower two crossings. Then connect the points where lines from centre get out and include the points where the loops get out below, if you see what I mean. If you don't see what I mean, think it through.
To the left the sole line through centre is prolonged so at the outside it connects to the lower parallel line from centre. The upper parallel line can be conneced to the start of the rope - the point where you started to put your pen. Or they can be marked off both as loose ends, since they are beginning and end of knot, but they can be connected and usually should, as with any flat knot of decorative kind.
To the right the lower parallel line from centre bends down to meet where the two original loops ended. Also to the right, the upper parallel line from centre bends down to meet the sole line from centre.
Both left and right, the connections imply a new place of crossing strands outside the original two loops.
Now you will fill in ALL the crossings of strands, whichever is above or below. When I draw, I mark the below strand by pretending two ends of strands get around the parallel lines of upper strand. Every strands everywhere in the know alternates above and below, above and below at the crossings, note well: when the knot is ready.
And after this, you can either try to hold the one diagram above where you are handling the rope, or you can make a series of diagrams showing the different stages.
Start from complete knot (and imitate the same series of diagrams in reverse order).
Next diagram the upper parallel line is no longer there - since it is the end of the knot, this strand is now taken away. Where any other strand went under it, draw instead a connected strand. The latter end of the knot should now be on the right side, and the middle loop crossing should have only one strand per diagonal. Take your time to make the crossings detail of the diagram right and corresponding to where exactly same crossings (check they are the same!) shall be in the last diagram (or are already in the first one you drew). If you have done it correctly, the second to last diagram should have a kind of pathway for the last strand, consisting of strands the cross twice below or twice above around where the last strand will cross above or below it.
I will enumerate these double crossings from upper right to lower left, I will suppose you got all crossing same way as I did, if you got them reverse way, reverse the directions (make double belows into double aboves), and what I had at the lowest parts of the diagram was loops crossing themselves the up-left - down-right lines above the low-left - up-right ones:
Then you take away the diagonal up-left to down right, you get another diagram, which is easier to describe from its starting point where the right hand loop ended at lower right, I presume you took loops ending at up-left - down-right above low-left - up-right on the lower side. As you take the end to upper right part of right loop, again you cross above, then two below under the crossing of the loops, then one above over lower left part of left loop. After that, you have the diagram in chords.
After that - now realising second to last diagram in chord - the end gets above upper left part of left loop, under up-mid left part of right loop, again under the previously made diagonal, above low-mid right part of left loop, below low right part of right loop, above original secondary loop.
AND from there you get the end upwards to get through the gateways of double aboves and double belows already described.
Now, getting beyond diagrams, the end of the knot should start again at the beginning beside the original beginning, and now it is just below-above-below-above all the way, sometimes crossing chords still single, sometimes crossing chords already doubled. At the end of the doubling, one can leave it there or triple, same method.
If one needs to even things out, by narrowing, and to get sufficient chord for the full tripling (or doubling) one does so by pushing and pulling so you get more and more of a loop until you get to the free end. Finally, the ends where doubling starts and ends are hidden under one of the other strands, like the one where the left hand loop gets down over itself. And they are firmly attached - sewing, gluing, etc.
Hans Georg Lundahl
Bpi, Georges Pompidou
St Mary Salomé
22-X-2014
PS: I regarded a picture from Sweden of the knot. There is a variety which is popular, where the middle is traversed by three parallel horizontals instead of by two diagonals crossed by one opposite diagonal. I drew the diagram.
As the most popular variety starts with three loops, that is how I drew it.
Upmost and nethermost parallel horizontal belong to a loop added to original ones (thus, on my diagram as often enough, a fourth loop) and woven all way through, above-below etc. but obviously both strands of it above same and below same, till it passes the leftmost loop above the beginning end of the knot.
Then the midmost horizontal strand is added by taking the end of the strand and passing it between the strands of the horizontal loop, weaving now above where the surrounding strands are below the loop strands, and below where the surrounding strands are above it, until it passes through the leftmost bight of the loop.
This gives a hint of an alternative way - and an easier one - of making the variety I take to be more original. After original loops, the end only gets woven in towards the middle, then one makes a loop by crossing and gets that loop woven further left, then one gets the end of the srand woven right, take a bight, turn it left through the gates above described.
Added Day of St Raphaël, 24-X-2014/HGL
It differs notably from the Turkish knot which is more gridlike and only bends on the outside of the knot. For the Spanish Mat you start with on to five loops which remain such. And only loop or central loop crossing must contain at the end two strands crossing along one diagonal and one along the other one, and as the strand does that it also bends on the outside.
Let us say you start out with two loops, these point upward, the strand crosses itself in the same direction below. Then you make the central loop crossing so the strands at its lower end cross the other way. THEN you fill in the knot from the outside, so that in the end the central loop crossing has one diagonal one strand through, opposite diagonal two strands through. And this is where it gets complicated to describe in words without making a diagram. So, instead of getting on, why don't I tell you about the diagram making? You draw after my instructions, and then make the knot according to the drawing.
To start the drawing you assume the two loops have already crosses, so what you draw will be one left loop and one right loop with one almondshaped space in the middle. Draw them in one ductus of the pen.
Then concentrate on that central space. Draw two parallel lines low left to up right and one line crossing both within the loop (it can be bent so it's vertical in the middle, like a backward oblong s) upper left to lower right.
Then continue the lines to the outside of the two loops, under their upper crossing obviously and over their lower two crossings. Then connect the points where lines from centre get out and include the points where the loops get out below, if you see what I mean. If you don't see what I mean, think it through.
To the left the sole line through centre is prolonged so at the outside it connects to the lower parallel line from centre. The upper parallel line can be conneced to the start of the rope - the point where you started to put your pen. Or they can be marked off both as loose ends, since they are beginning and end of knot, but they can be connected and usually should, as with any flat knot of decorative kind.
To the right the lower parallel line from centre bends down to meet where the two original loops ended. Also to the right, the upper parallel line from centre bends down to meet the sole line from centre.
Both left and right, the connections imply a new place of crossing strands outside the original two loops.
Now you will fill in ALL the crossings of strands, whichever is above or below. When I draw, I mark the below strand by pretending two ends of strands get around the parallel lines of upper strand. Every strands everywhere in the know alternates above and below, above and below at the crossings, note well: when the knot is ready.
And after this, you can either try to hold the one diagram above where you are handling the rope, or you can make a series of diagrams showing the different stages.
Start from complete knot (and imitate the same series of diagrams in reverse order).
Next diagram the upper parallel line is no longer there - since it is the end of the knot, this strand is now taken away. Where any other strand went under it, draw instead a connected strand. The latter end of the knot should now be on the right side, and the middle loop crossing should have only one strand per diagonal. Take your time to make the crossings detail of the diagram right and corresponding to where exactly same crossings (check they are the same!) shall be in the last diagram (or are already in the first one you drew). If you have done it correctly, the second to last diagram should have a kind of pathway for the last strand, consisting of strands the cross twice below or twice above around where the last strand will cross above or below it.
I will enumerate these double crossings from upper right to lower left, I will suppose you got all crossing same way as I did, if you got them reverse way, reverse the directions (make double belows into double aboves), and what I had at the lowest parts of the diagram was loops crossing themselves the up-left - down-right lines above the low-left - up-right ones:
- First, a double below belonging to the right loop at its upper end, between the right hand secondary loop from "previous" (not yet drawn) and upper bend of right loop.
- Then, a double above, belonging to upper left loop, between upper right loop and the secondary line from previous.
- Third, a double below, belonging to the diagonal through loop crossing that goes up-left to low-right, from the left part of the right loop to the crossing line.
- Fourth, a double above, belonging to the left part of the right loop, from the diagonal up-left - down-right to the lower (in this diagram sole) diagonal of the low-left - up-right ones.
- Fifth, a double below, belonging to the left part of the left loop between two parts of the left hand secondary loop from previous, and
- Sixth, a double above, belonging to left hand secondary loop from previous between the low point above left part of left loop where previous ended to above where the additions of this started, also crossing left part of left original loop.
Then you take away the diagonal up-left to down right, you get another diagram, which is easier to describe from its starting point where the right hand loop ended at lower right, I presume you took loops ending at up-left - down-right above low-left - up-right on the lower side. As you take the end to upper right part of right loop, again you cross above, then two below under the crossing of the loops, then one above over lower left part of left loop. After that, you have the diagram in chords.
After that - now realising second to last diagram in chord - the end gets above upper left part of left loop, under up-mid left part of right loop, again under the previously made diagonal, above low-mid right part of left loop, below low right part of right loop, above original secondary loop.
AND from there you get the end upwards to get through the gateways of double aboves and double belows already described.
Now, getting beyond diagrams, the end of the knot should start again at the beginning beside the original beginning, and now it is just below-above-below-above all the way, sometimes crossing chords still single, sometimes crossing chords already doubled. At the end of the doubling, one can leave it there or triple, same method.
If one needs to even things out, by narrowing, and to get sufficient chord for the full tripling (or doubling) one does so by pushing and pulling so you get more and more of a loop until you get to the free end. Finally, the ends where doubling starts and ends are hidden under one of the other strands, like the one where the left hand loop gets down over itself. And they are firmly attached - sewing, gluing, etc.
Hans Georg Lundahl
Bpi, Georges Pompidou
St Mary Salomé
22-X-2014
PS: I regarded a picture from Sweden of the knot. There is a variety which is popular, where the middle is traversed by three parallel horizontals instead of by two diagonals crossed by one opposite diagonal. I drew the diagram.
As the most popular variety starts with three loops, that is how I drew it.
Upmost and nethermost parallel horizontal belong to a loop added to original ones (thus, on my diagram as often enough, a fourth loop) and woven all way through, above-below etc. but obviously both strands of it above same and below same, till it passes the leftmost loop above the beginning end of the knot.
Then the midmost horizontal strand is added by taking the end of the strand and passing it between the strands of the horizontal loop, weaving now above where the surrounding strands are below the loop strands, and below where the surrounding strands are above it, until it passes through the leftmost bight of the loop.
This gives a hint of an alternative way - and an easier one - of making the variety I take to be more original. After original loops, the end only gets woven in towards the middle, then one makes a loop by crossing and gets that loop woven further left, then one gets the end of the srand woven right, take a bight, turn it left through the gates above described.
Added Day of St Raphaël, 24-X-2014/HGL
Wednesday, August 6, 2014
Building assignment - will it hold?
- Needed
- One chessboard, squares same size as the faces of cubic toy blocks. The toy blocks shall be 85, optionally 101 in number. Sand. Fine tool (like spoon sufficiently small to slip in between two toy blocks). Flat stable place to put chessboard on.
- Wanted
- To see if the following construction will hold or fall apart.
- First level (may be doubled in height, if so you need 16 extra, i e 101 instead of 85):
O O O O O O O O O O O O O O O O - Between levels (whenever there is empty space between non-top blocks):
- Fill in with sand, so that following level doesn't fall apart until the one following that stabilises it. Flatten it, so it doesn't interfere with next blocks to be placed.
- Level two (noted that each square is really half a square down and half a square to the right from the one marked: with tables, it is difficult to show blocks not right within the squares on the chessboard):
O O O O O O X O O O O O O X O O O O O O X X O O O O O O X O O O O O O X O O O O O O X X X X X X X X X - Level three (normal square designation again):
O O O O O O O O O O O O O O O O O O O O O O O O - Note:
- The four isolated blocks are really top blocks, no need to fill in any sand between them and the cross.
- Level four, top (see caveat for description of level two):
X O X O X O O O O O X O X O X X X X X X X X X X - Finally:
- Carefully empty the sand out of the building since as long as sand is holding it together we don't really know if the construction is good or not. For instance, use a spoon, dig in, pull out along the chessboard level.
- Desired:
- Videos with building process and stable outcome documented.
Sunday, July 20, 2014
They call it Schorle or G'spritzt
Everyone knows that apple juice is delicious (ok, nearly everyone, some would be allergic, have some quirk about the taste or not having tasted it as yet). It has nearly - as taste is concerned - the strength of wine, yet it is non-alcoholic. However, on a hot day, you might want something a bit thinner.
Sure enough, in Germany they would call it Apfelschorle, in Austria Apfelsaft G'spritzt. Half a glass of apple juice, half a glass of sparkling water. Or whatever proportions you prefer.
Before going on, as we are on terminology, yes, the German language is decentralised, fortunately. For instance, in some parts of the area one would call blackcurrants Schwarze Johannisbeeren and redcurrants Rote Johannisbeeren (Saint John's berries), in other parts you would say Schwarze Riebisl and Rote Riebisl (confer Ribes, the Latin word for them). If I did not get the terminology wrong in Vienna, you need not bother to say "schwarz" or "rot" since the black ones are Johannisbeeren, like Cassis in French, and the red ones are Riebisl, like groseilles in French. German has no one linguistic centre which decides every question of standard terminology, precisely as English has at least two main centres - Oxford and New York (or whatever) and a lot of subsidiary ones. But back to Schorle/G'spritzt.
And the same is true of wine, a hot day. Weiße or Rote Weinschorle in Germany, or Weißwein G'spritzt or Rotwein G'spritzt in Austria continue the ancient custom of adding water to wine.
It is very good for the taste and comfort on a hot day. And, since it means less alcohol per sip, it slows down the intake of alcohol. Not meaning you should drink too much of this drink any more than of wine unmixed, of course. "Who's this moderation you should drink alcohol with?" as they joke in France, that is a question that can be seriously answered: a side of yourself, if you are as you should want to be.
Hans Georg Lundahl
Bpi, Georges Pompidou
Sixth Sunday after Pentecost
20-VII-2014
Friday, January 31, 2014
Making a table with original and translation side by side
- Take a Latin text (or a text in whichever language you translate from, with your rights to it or with copyrights already expired, if I can add some juridical advice), insert it into a table and insert before it starts the first tr = table row which is marked valign="top" = vertical alignment so that tops are on same level, and the first td = table detail:
<table><tr valign="top"><td>Deinde cum dicit ....
...</table>
- Divide it into sentences through insertions of following "balises" (tags, I nearly forgot translating the word):
Non quod philosophi, ductu rationis, potuerint pervenire, per ea quae facta sunt, in cognitionem personarum quantum ad propria, quae non significant habitudinem causae ad creaturas, sed secundum appropriata. <td> & nbsp ; <td>
<tr><td> & nbsp ;
<tr valign="top"><td>Dicuntur tamen defecisse in tertio signo, id est in spiritu sancto quia non posuerunt aliquid respondere spiritui sancto, sicut posuerunt aliquid respondere patri, scilicet ipsum primum principium, et aliquid respondere filio, scilicet primam mentem creatam, quam vocabant paternum intellectum ut Macrobius dicit in libro super somnium Scipionis
- Add your translations on the right hand side of the upper part of each such divide:
Uno quidem modo per causalitatem. <td> & nbsp ; <td>One way is by causality.
<tr><td> & nbsp ;
<tr valign="top"><td>Quia enim huiusmodi creaturae sunt defectibiles et mutabiles, necesse est eas reducere ad aliquod principium immobile et perfectum. <td> & nbsp ; <td>For because suchlike creatures are defective and mutable, it is necessary to reduce them to something immobile and perfect.
<tr><td> & nbsp ;
<tr valign="top"><td>Et secundum hoc cognoscitur de Deo an est. <td> & nbsp ; <td>And according to this it if known of God "whether" [=that!] He is.
<tr><td> & nbsp ;
<tr valign="top"><td>Secundo per viam excellentiae. <td> & nbsp ; <td>Next by the way of excellence.
- How does this look when finished?
Here is a preview from first paragraphs of the passage:
Deinde cum dicit quia quod notum est, manifestat propositum, ordine tamen retrogrado. Next, when saying "that which is known", he manifests the meaning, but in reverse order. Primo enim consentit quod sapientes gentilium de Deo cognoverunt veritatem; secundo, ostendit quod in eis impietas et iniustitia fuerit, ibi ita ut sint inexcusabiles; tertio quod iram Dei incurrerunt, ibi qui cum iustitiam Dei. For first he agrees that the wise of the geintiles knew the truth about God; next he shows that there was impiety and injustice in them, in that place "so that they were inexcusable"; thirdly that they incurred the wrath of God in that place "who, having [known] the justice of God" [verse 32 - verses were not yet made for the Bible.] Circa primum tria facit. About the first thing he does three things. Primo, quid de Deo cognoverunt; secundo, ostendit a quo huiusmodi cognitionem acceperunt, ibi Deus enim illis; tertio, ostendit per quem modum, ibi invisibilia enim. First what they knew of God; then, he shows from whom they received suchlike knowledge, in that place "For God hath manifested it to them" (v. 19); thirdly, he shows in what manner, in that place "For the invisible things of him" (v. 20). Dicit ergo primo: recte dico quod veritatem Dei detinuerunt, fuit enim in eis, quantum ad aliquid, vera Dei cognitio, quia quod notum est Dei, id est quod cognoscibile est de Deo ab homine per rationem, manifestum est in illis, id est manifestum est eis ex eo quod in illis est, id est ex lumine intrinseco. Thus he first states: I am right to say that they have detained the truth of God, for there was in them, in respect to something, a true knowledge of God in them, "Because that which is known of God" (v. 19), that is what is knowable about God by man by reason, "is manifest in them" (v. 19), that is it is manifest to them from what is in them, that is from their interior light.
This will be made available in more detail and in context on my blog Creation vs. Evolution when writing about Roman 1:20 and Richard Dawkins. The Latin text is from:
Corpus Thomisticum
Commentaria in Romanus caput 1, lectio 6
http://www.corpusthomisticum.org/cro016.html
- How and why you do such a translation?
The how is about knowing the language. In this case Medieval Latin.
The why is about finding for instance St Thomas Aquinas' commentary to the Epistle to the Romans (here is from his lectio 6 to chapter 1) online in Medieval Latin and not having a clue where or if at all one English translation thereof is available even in print.
And of course finding something which an author not in Modern English online has said more appropriately than the authors that are available in that format. But once you start looking at St Thomas Aquinas (or some other author from the ages of faith which were also the true ages of reason), and comparing what he has to say to what is available that is not a problem.
Hans-Georg Lundahl
Nanterre UL
St John Bosco
Founder of Salesians
and of Institute of Daughters
of Mary Help of Christians
31-I-2014
Update, St Matthias Day, here are the tables or rather the posts that include them:
Creation vs. Evolution : Romans 1:20 and Dawkins, Richard
http://creavsevolu.blogspot.com/2014/02/romans-120-and-dawkins-richard.html
Origen also made a Commentary on Romans, including of course 1:19 and 1:20
http://creavsevolu.blogspot.com/2014/02/origen-also-made-commentary-on-romans.html
Sunday, January 12, 2014
Instructions about Printing
- Hans-Georg Lundahl
- I would be a bit more interested in reprints, but reposts are not bad either, especially with links to my original post.
- Rick DeLano
- Publishing in print, alas, is not something I am presently equipped to undertake, but that may change in the future.
- Hans-Georg Lundahl
- A little note on further use conditions
http://hglwrites.wordpress.com/a-little-note-on-further-use-conditions/
Those are the conditions. Now, you may not have a press, but you might have:
- computer with both internet and word and connexion to a printer
- a neighbourhood with a photo copy service.
In that case you are as equipped as I was for the actual printing I did in 2011. Alas I could NOT get any very good shape when trying to bookbind without knife or table just with needle and thread in the street. Ask Hyoo Mikdonalad about the result. - Rick DeLano
- HA!
- Hans-Georg Lundahl
- I don't know if you have bought the kind of old fashioned paperback books in which you have to cut pages open. I have, and I have studied folding of paper as it applies to this. If you fold once, you have four pages on a printed sheet, no cutting. If you fold twice, eight pages, you cut only on top, and if you fold three times, 16 pp. you cut the tops and some of the sides as well.
Now, in order to get the pages where you want, there are some things to observe:
- deciding how much each printing sheet is folded, obviously
- knowing what pages to put side by side on the printing sheet so the right ones are side by side in the final result (big hint: not exactly same ones);
- knowing how much you diminish each page from A4 as it comes from the printer of your computer to the part it has in the folds and writing the pages sufficiently big to start with (meaning you copy from blog, put text on word, mark all, augment size to 14 or even 20 points).
For two folds per sheet, assuming you start a sheet with page 1 (which you can if it is the second sheet and the first is numerated in Roman Numerals after the title page and it contains a foreword and an index), the first sheet would have pages joined like this:
- 8-1
- 2-7
- 6-3
- 4-5
Then the diminished page with 8-1 side by side is joined to that with 4-5 top to top and similarily for the pages between 1 and 4, between 5 and 8.
And 9 to 16 of course go as 1 to 8, meaning you start off the next (and continue):
- 16-9
- 10-15
- 14-11
- 12-13
The copy machine is on A3 > A4 during the operation. Both when 16-9 (each a separate A4 from the printer) are joined to one A4 and when 16-9 is joined to 12-13. When it comes to joining the two sides of a printing sheet, it is of course not A3 > A4, but recto/verso copying.
When you have all the rectos and all the versos of all the printing sheets with all the original pages from the word document, obviously you decide how many double sided copies you want and from there print them and after that start folding.
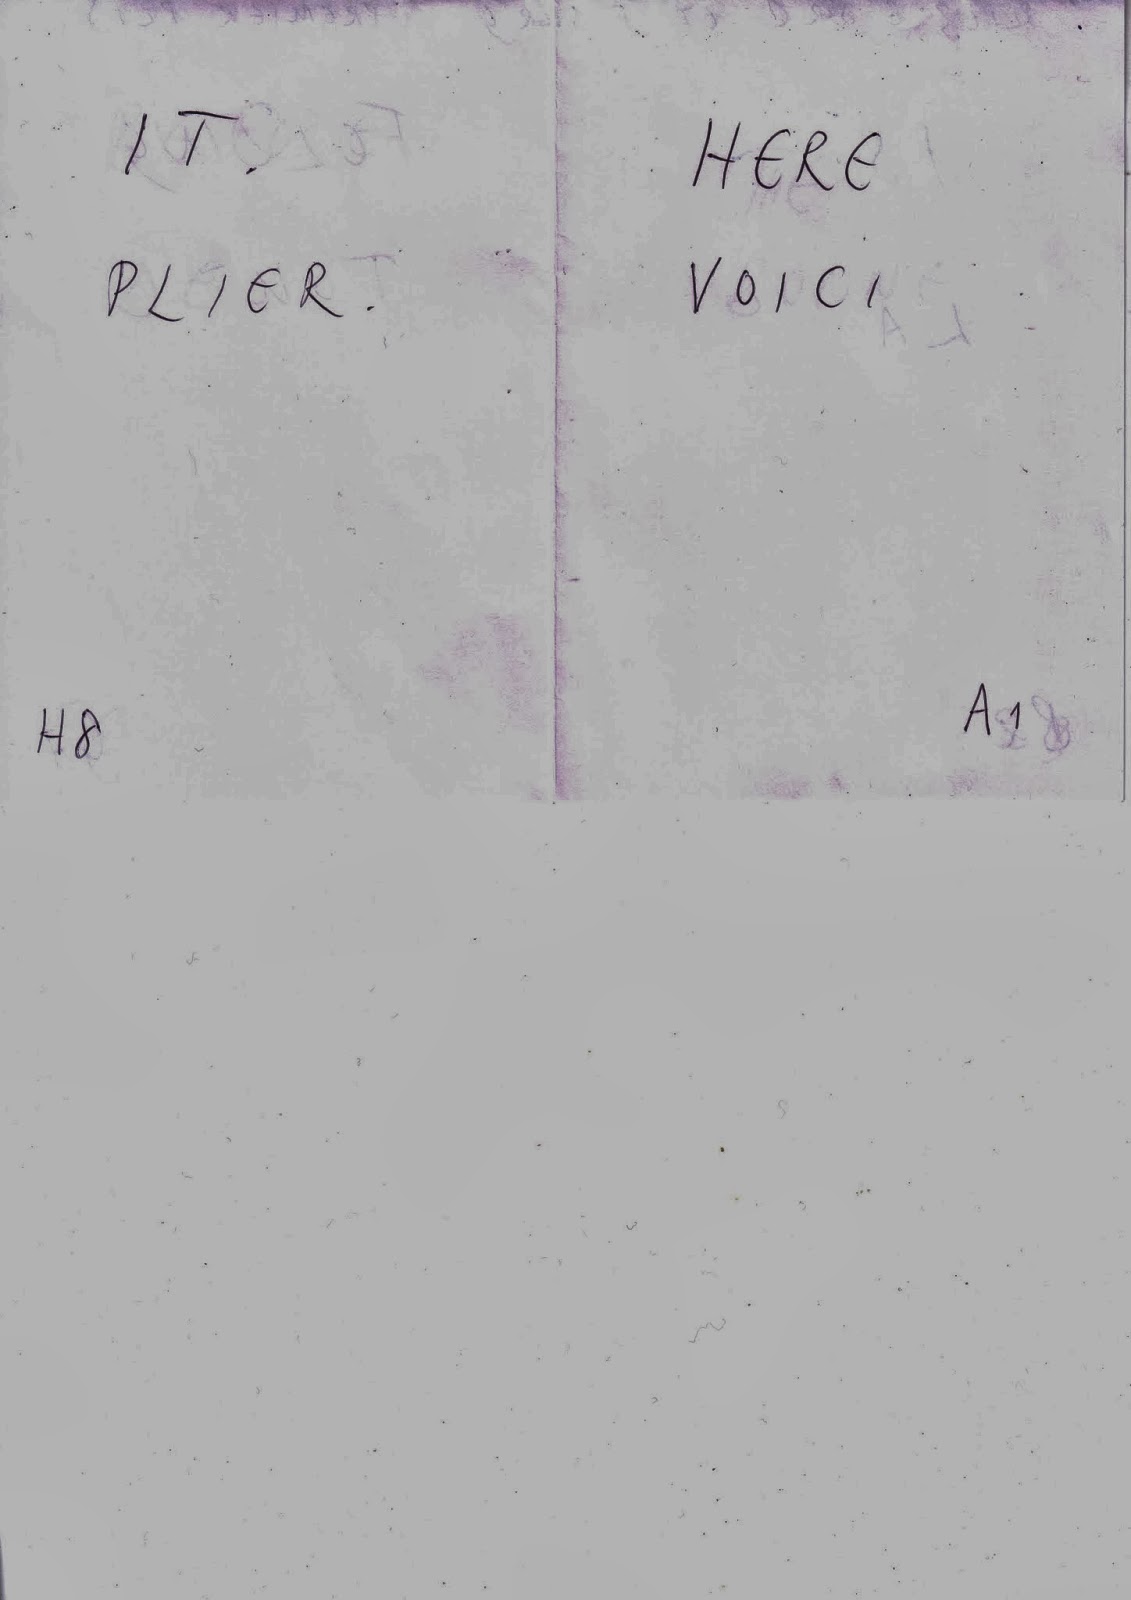
| Recto or outfold before any folding |
|---|

|
| Verso or infold before any folding |

|
| Outfold after first fold |
|
| New infold after first fold |

|
| English text/Texte français |
| Here is the right position before folding it. |
| Voici la bonne position avant de tout plier. |
Subscribe to:
Posts (Atom)
